Google Tag Manager (GTM) allows your team to collect data essential to making smart marketing decisions.
Understanding the benefits of GTM and how to properly utilize it can be a challenge, so we’ve put together this guide as a reference point. You’ll learn how to set up your own account and get the most out of it.
Why Google Tag Manager is important for tracking behavior and solving analytics problems
Tags are snippets of JavaScript code added to a webpage to collect data and information. They help you monitor website or app visitor activity so you can optimize your site based on behaviors.
Most websites need several tags in order to track different behaviors and user flows, like form submissions or page clicks. The more tags a website has, the more difficult it can be to manage.
Enter Google Tag Manager.
GTM is not the only tag management tool available, but it is the most accessible. It’s designed to work exclusively Google Analytics, which is why we’re focusing on it. Here are a few others:
TagCommanderAdobe Dynamic Tag ManagementSegment7tagTealium
GTM helps marketers get the customer data they need without habitually relying on a developer as the middle person. Here’s how:
Stay organized
Without a tag manager, a developer will need to manually add tags to your site, and set unique rules for each instance. Once in place, they’ll have to manually monitor activity, troubleshoot issues, discard expired code when new code is added, avoid conflicts, and so on.
This is time-consuming and costly. Tag management streamlines the entire process.
Tag managers minimize the amount of code you need to deploy across your website and allow you to house all code snippets in one central hub, keeping all of your tracking data neat and organized. And, it’s user-friendly—you don’t need to be a developer to make code implementations or changes.
Think of tag management as a managing editor that oversees your content marketing operation. You can collate your publishing schedule, assignments, tasks, and documents in one place, and even automate activities, but without someone monitoring the workflow, the system will likely crumble.
So while you don’t need a developer to monitor a tag manager, you do need personnel to keep an eye on it. That said, don’t cut IT out completely. Complex tagging tasks may still need to be implemented via a rule-driven, graphical interface.
Keep technology costs down
Bugs and barriers are inevitable, but GTM makes implementation and debugging easier, faster, and as a result, cheaper.
A faster launch means your team has more time to work on other tasks, maximizing valuable resources. GTM is also completely free, so your team doesn’t need to allocate any of their budget towards another marketing software.
Still, mistakes can and do happen. To keep costs down and avoid doubling back to fix user error, follow these best practices:
Define your goals and track what you actually need to measure, rather than casting a wide net to capture data you don’t need and won’t analyzeAvoid piling too many tags on every page, as that will slow page load downMake sure to discard or disable unused tags, especially after running a test and deciding not to proceed past trialAvoid deploying custom HTML tags that break existing codeEnsure you set up analytics alerts and consistently QA new implementations to detect buried issuesRetain publish rights to personnel who are familiar with the system, as giving account privileges to unqualified team members could jeopardize activity
Increase the value of your analytics
Google Tag Manager doesn’t have reporting capabilities. Rather, it sends the valuable information it collects to Google Analytics for analysis.
Universal Analytics, and especially the powerhouse that is Google Analytics 4, provides great insight into which of your pages are performing well—but GTM helps you dive deeper.
Your basic analytics tool can find things like:
Real-time pageviewsLocation and device information of site visitorsTraffic sourcesTop landing pages/blog posts
To get even more value out of these insights, you need to take advantage of tags to discover things like:
How users navigate your siteWhich pages generate the most conversionsWhere website visitors are most likely to leave your site
How to set up Google Tag Manager
To get your Tag Manager account set up, follow these steps:
1. Start with your goals
Determining your tracking goals will help you decide which types of tags you need to create.
You can create tags for Google Ads remarketing, conversion tracking, monitoring form submissions or button clicks, and more. There are also third-party integrations that you can connect to track information from sites like Hotjar, Oktopost, or Pinterest.
Create a marketing tags strategy before heading over to Google Tag Manager and creating your account.
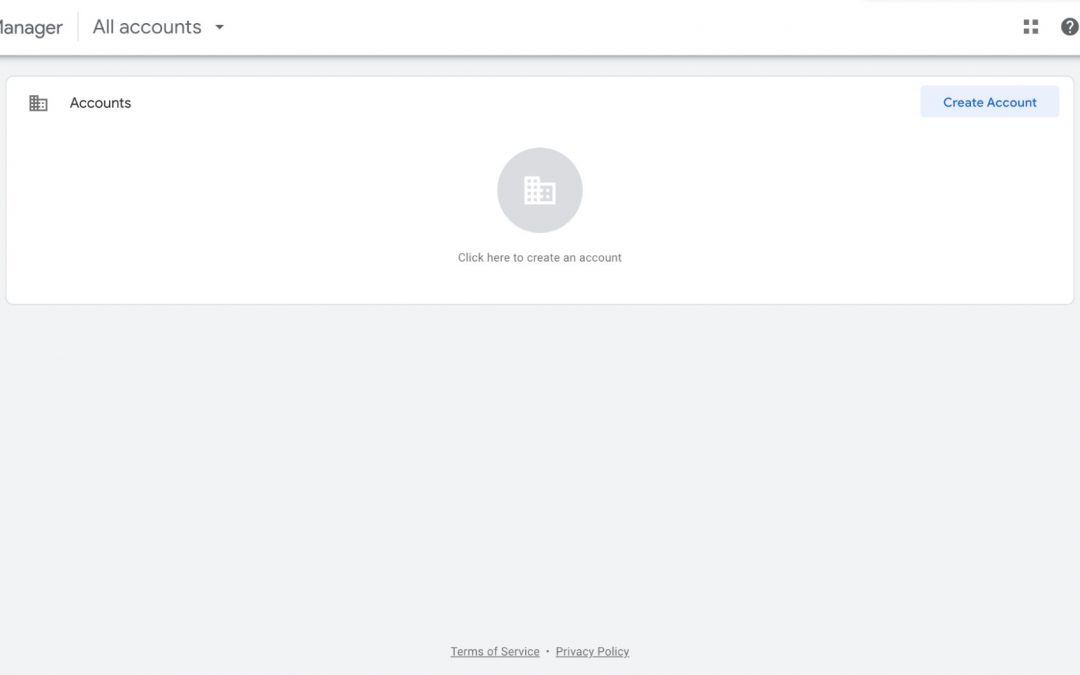
2. Set up an account
Creating a Google Tag Manager account needs to be done through your Google email, so choose an admin or owner of the GTM account first. After, you can share permissions with others on your team who need to access it.
Log in with your Google account, then click Create Account on the main dashboard to start setting up shop:
From here, you’ll need to name your account. Best practices dictate naming it after your business to keep your tag management straightforward.
Then, you need to set up your container. A container is where all of your tags will live, so you should name this after your site or URL.
Choose the type of platform your site or app lives on before clicking Create. This could be the web, an iOS or Android mobile app, AMP use, or server use:
Your next step is to install the container snippet onto your website. This is a snippet of JavaScript that needs to live on every page in order for the tags to properly track activity.
There are two parts to this snippet:
The first needs to live in the <head> section of your websiteThe second should be pasted in the <body> section
The main three labels that you’ll see in the sidebar of your GTM dashboard are tags, triggers, and variables:
Tags are tracking codes that collect data from a website or appTriggers set conditions that tell a tag when to fireVariables define when triggers should tell tags to fire
3. Install the Google Analytics tag
Keep in mind that if you do this through GTM, you’ll need to delete any Google Analytics tracking information you’ve previously placed on your website or you’ll end up with duplicate data.
Click Add a new tag on your dashboard to get started, like GA Pageviews:
Next, configure your tag. Click the top box to see a long list of the 50+ tag types:
Click the top option: Google Analytics: Universal Analytics or Google Analytics: GA4 Configuration, depending on which version you’re using. For example purposes, we’re using UA.
Under the Tracking Type dropdown that appears, click Page Views:
4. Set up the property variable
You have two options when setting up your variable. First, you can check Enable overriding settings in this tag and paste your UA Tracking ID:
Or, you can create a custom variable. While this takes some more initial setup, it’ll make things easier for you in the long run because it keeps your UA Tracking ID stored, rather than needing to paste it in for every tag you create.
GTM offers two different types of variables: built-in variables or user-defined variables.
Built-in variables are automatically defined by GTM based on elements detected in the code snippet. They offer several common variable types, making it easy to create basic tags.
Click Configure to set up each of the variables you’ll need in the future. You can always come back to this and add more:
User-defined variables are custom, based on the values you set. So you can create a constant variable that stores your Google Analytics Tracking ID:
To do this, click New under the User-Defined Variables section. Then under variable types, scroll down until you find Google Analytics Settings:
Paste your Tracking ID into the field, then save:
Now, when you create your Google Analytics tag, you don’t have to check Enable overriding settings in this tag. Instead, simply open the dropdown and select your new variable:
5. Configure your trigger
The final step in deploying your first tag is choosing a trigger that will make the tag fire:
Click on the Triggering box and select All Pages from the available options:
Then click save. To get your tracking officially started, click Submit on your workspace changes. You’ll likely have two: one new variable and one new tag:
6. Set up cross-domain tracking
If your business’s customer journey leads users to different domains, cross-domain tracking helps ensure your tracking code counts them as one, rather than inflating your data and counting them for each domain they land on.
This isn’t necessary for subdomains; only if you have two entirely different domains that work together.
You can set up cross-domain tracking at the tag level by checking the Enable overriding settings in this tag and accessing More Settings > Cross Domain Tracking, but the best way to do this is in your Google Analytics ID variable.
Head to the Variables tab and open the variable you created with your GA Tracking ID. Click into the Variable Configuration box, then click More Settings > Cross Domain Tracking:
In the Auto Link Domains field, insert each of the domains (if there is more than one) separated by commas before clicking save.
7. Understand the data layer
The data layer is a JavaScript code snippet that stores data from your website before sending it to GTM. It acts as an additional layer between your site’s HTML, which is constantly changing, and your tags, triggers, and variables.
Having a data layer helps make your data collection process smoother. For most tags, you don’t need to do anything extra—the data layer is automatically initiated by the initial GTM code snippet you placed on your website.
However, if you want to collect custom data, like product data or transaction data for eCommerce tracking, you’ll need to set up a separate data layer.
To do this, you need to create a data layer variable. This will allow GTM to read additional values from your website and pass it through to your deployed tags.
Your development team will have to assist with creating and implementing data layer code snippets for each page you want to track additional information for. These must be done on a page-by-page basis, and the script will look like this example from Google’s developer tools.
In this instance, there are two data layer keys: page category and visitor type. Depending on what you need to track, you might have one or you could have several keys.
Once your developer has implemented this code on each relevant page, you’ll need to create a new data layer variable for each key.
Head to the Variables tab, then click New to create a new user-defined variable. Select Data Layer Variable from the list of options:
In the Data Layer Variable Name field, you need to enter the key name the exact same way it was written in the code. So from the example above, you’d create two data layer variables. One would be written pageCategory and the other would be visitorType:
8. Plan for user management
You can add and remove users or user groups from your GTM depending on who needs access. Head over to the Admin tab, then click the User Management option:
You’ll get a bird’s eye view of all current users and their level of permissions. There are two options:
Admin: Can create and remove containers, as well as manage user permissionsUser: Can view basic account information and access specified containers
You can also set user permissions at the container level, whether you want them to have no access to certain containers, view only, make edits, approve edits, or publish edits.
Take the time to add each member of your team and set their permissions based on how qualified they are to make changes and deploy new tags.
Utilizing Google Tag Manager effectively
Here are a few tips to help you use GTM effectively.
Make sure GTM’s base code is present on every page
You don’t want to implement a complex tracking campaign, then realize after the fact that your GTM base code isn’t present on some of your most important pages. This is why it’s key to ensure the code has been properly inserted into your site’s HTML.
There are a few ways that you can do this, but the most basic is simply to check your website’s page source.
Go to the page you want to check, right click, then select View Page Source. Search the page (using a quick CTRL+F/CMND+F command) for gtm.js to check for the base code:
You can also click the Preview button on the top right corner of your GTM dashboard and type in your website URL to see if the correct container has been connected to your website:
Anytime you create a new container, double-check that the code was properly implemented.
Track events
Google Tag Manager combined with Google Analytics is great for tracking events that happen on your site.
These events might be:
Form submissionsButton clicksSign-upsScrollsVideo views
To do this, you’ll create another Google Analytics: Universal Analytics tag, but this time the Track Type will be Event:
Fill out the rest of the information. Perhaps a “link click” event tracker for your sales page link in a blog post:
Category: Link ClickAction: Sales Landing PageLabel: {{Page Path}}Value: The value of the event—this is optional to fill in.Non-Interaction Hit: TrueGoogle Analytics Settings: Select the GA Tracking ID variable we set up earlier.
Then you’ll need to create your trigger, in this instance, a trigger that specifies which links you want to track clicks for. Select Page URL equals from the dropdown menus, then paste the URL to your sales page in the field:
You can create a number of different event tracking tags to analyze customer behavior, but don’t overwhelm yourself with data that doesn’t necessarily affect your bottom line.
Debug your tags
Monitor your tags so you know they’re working and that your data remains accurate. To do this, use the Preview and Debug Mode.
Similar to ensuring your base code is installed, click Preview and ensure that Include debug signal in the URL is checked.
Insert your website’s URL and click Connect. A preview window will open with a badge in the bottom right corner:
Go back to the Tag Assistant page to make sure everything is properly connected:
From here, you can check out each of the options to see if anything is broken:
Create constant variables
We covered how to create a constant variable for your Google Analytics Tracking ID. But if you’re working on retargeting campaigns with digital ads, you likely have other pixels installed on your website.
You can also create constant variables for those pixels so you don’t have to locate the proper pixel each time you create a new tag, and instead can select it from the dropdown.
Head to Variables and create a new user-defined variable. Select Constant from the list and paste in your pixel ID into the Value field before saving:
Be sure to name your variables so that you can easily figure out which pixel you need to add to which tags.
Install extensions
There are a number of Google Chrome extensions for Google Tag Manager that can make your life easier:
Google Tag Assistant has its own extension that allows you to check for tags on your website as you navigate through it.Tag Manager Injector is a useful extension for debugging and testing newly deployed tags.DataLayer Inspector+ helps your team understand what is being pushed to the data layer and if there are any issues.
Create a tag naming process
Get with your team to create a process or format for naming all of your tags so that everyone understands exactly what each tag is tracking. Put a document together that explains how these names were created so that everyone on the team knows what each tag does at a glance.
For example, you can have the tag type followed by what it’s tracking followed by the specified trigger. Come up with abbreviations or shorthand that your team follows to keep everything organized.
Conclusion
It’s time to take everything you’ve learned here and start tracking your own website activity and events. Start with the insights that mean the most to your business and go from there. To become an even greater Google Tag Manager expert, check out our online course.
The post The Complete Guide to Google Tag Manager appeared first on CXL.